The Events interface from the Dashboard allows you to Create, View, Manage and report on Events.
Contents
Creating Events
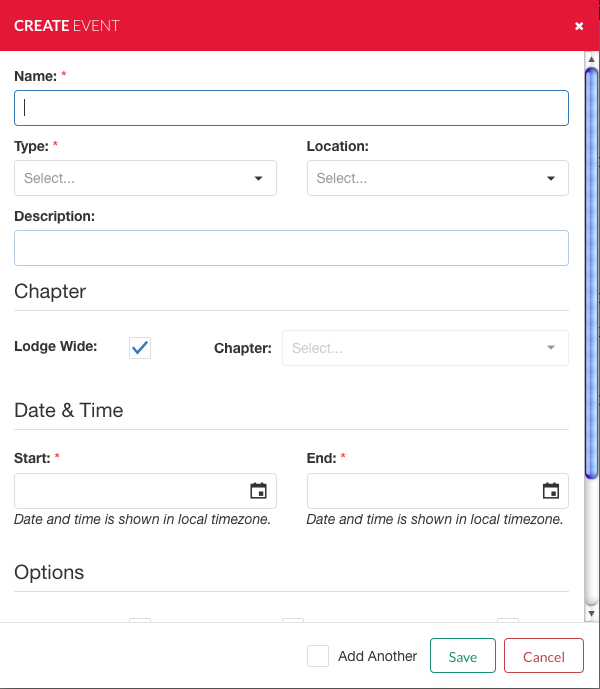
To add a new event, select the Add button from the top left of the Events screen. The add dialogue box will open.
Complete the Event Information
- Type in the Name of the event. **
- Select the Event Type from the pull down. **
- If you don't see the Event Type you need a new event type will have to be added first using the Settings > Events > Types Function.
- Select the Event Location from the pull down.
- If you don't see the Event Location you need a new event location will have to be added first using the Settings > Events > Location Function.
- Type in an Event Description.
- Indicate if it is a Lodge Wide event. NOTE: Use this for events that will count on your JTE numbers only.
- If a Chapter event only select the Chapter name from the pull down.
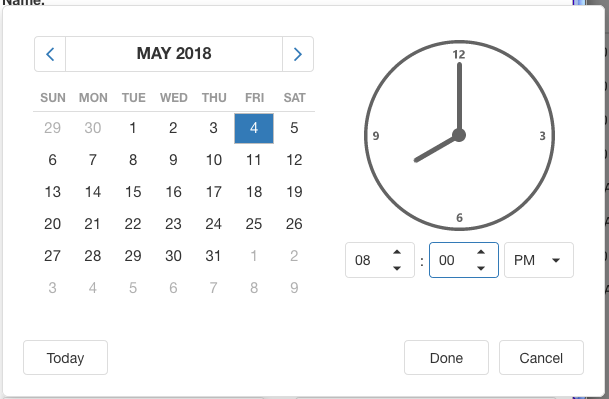
- Select the Event Start and indicate the start date/time. ** (see dialog example below)
- Select the Event End and indicate the end date/time. **
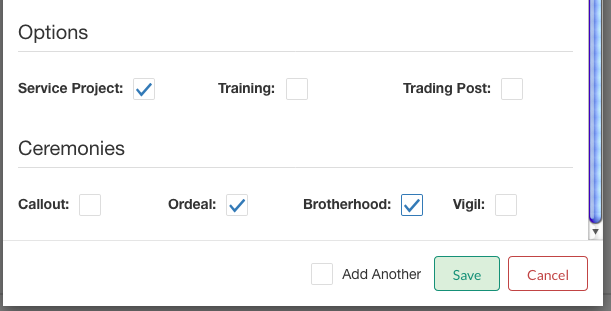
- Scroll Down to select any Options or Ceremonies that may be at your event. (see example below)
- If you are going to add more events select the check box Add Another, or select the Save button.
** REQUIRED fields will be Event Name, Event Type, Event Start date/time and Event End date/time.
When complete you will be back to the Events Grid.
Adding Fees
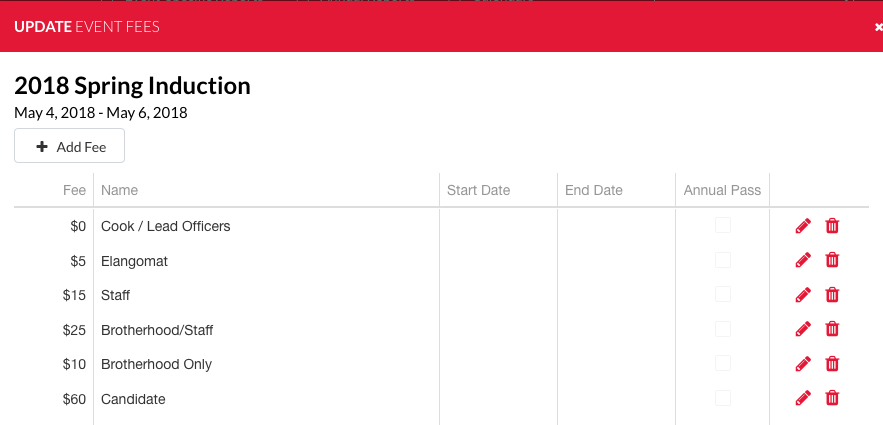
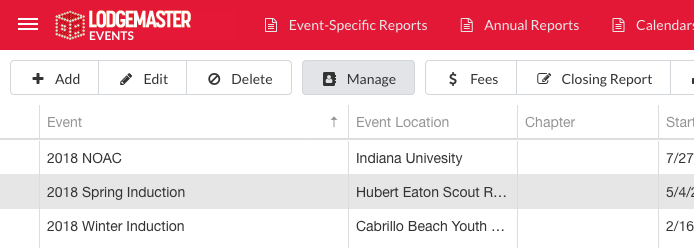
You will want to now add the fees for the event. This is not mandatory, but it will help you keep track of the collected fees. Select the event then the button. On the next screen select the button.
As a minimum you will need to type in a Fee and Name. If your Fee has a start date and end date you can input dates. This will allow you to either have late fees or even onsite fees different than the pre-event fees. After your are complete with your inputing, select the Icon to save your changes or the Icon to reject your changes.
When done select the closed button and you will be back to the event grid.
Edit Event Information
From the Events screen select "Edit"
Once selected you can edit the following information for the event:
- Name of the Event **
- Event Type **
- If you don't see the Event Type you need a new event type will have to be added first using the Settings > Events > Types Function.
- Event Location
- If you don't see the Event Location you need a new event location will have to be added first using the Settings > Events > Location Function.
- Event Description
- Chapter
- Either Lodge Wide or specific Chapter event
- Start & End Date / Time ** (See Dialog Example Above)
- Visibility to Public Member Calendar
- Indication type is any
- Ordeal
- Brotherhood
- Vigil
- Special Flags
- Callout Ceremony
- Lodge LLD
- Registration Link
- Candidates
- Members
- Brotherhood
** REQUIRED fields will be Event Name, Event Type, Event Start date/time and Event End date/time.
Managing Event Attendance
Add Attendee
From the Event Grid select the event you want to manage and select the button.
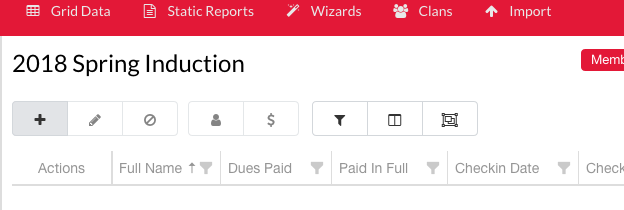
The your event attendance grid will be displayed. Select the button to add an attendee.
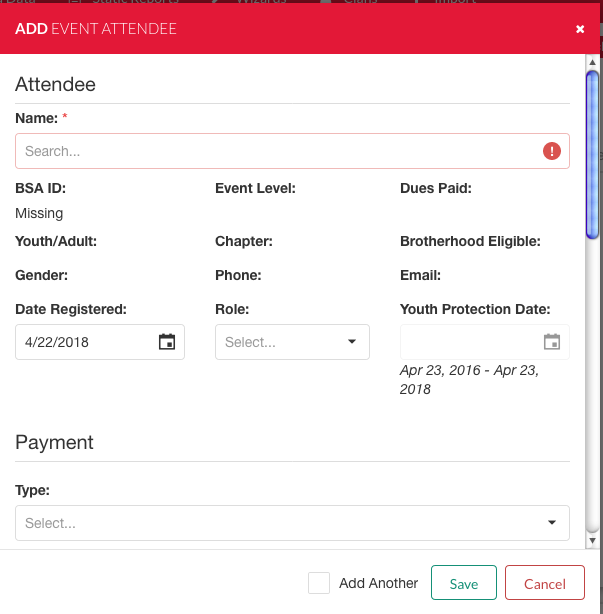
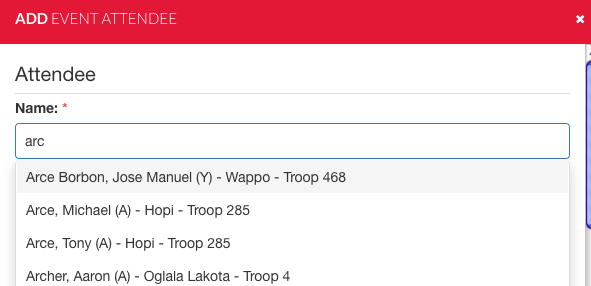
Type in a members name and select the member you want.
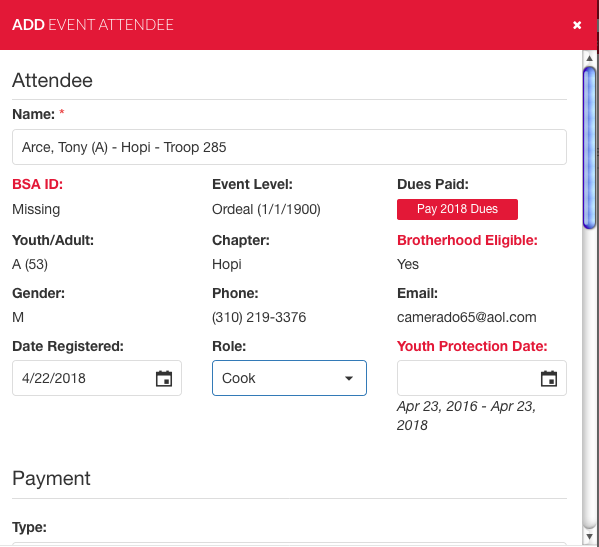
After you indication the member your screen will populate a number of fields and indicate items that need attention in red. When you get to the point of check-in you can take care of these updates and using the button you can collect the dues.
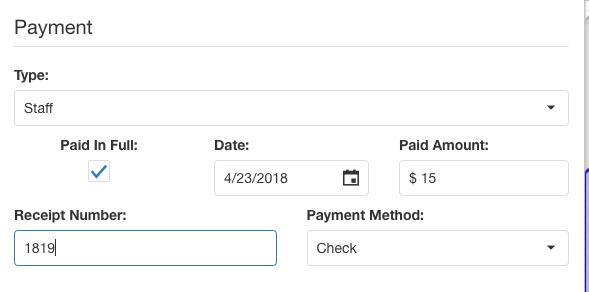
Scroll down the window to take any pre-event payments. Select the Type pull down to indicate the fee you are recording and the Paid Amount will fill in and the check box will fill in. Indicate the Payment Date, the Payment Method and if needed a Receipt Number. If the person will pay at the door select the check box to indicated that payment has not been taken and will be collected at the Check In.
In most cases you are done and will select the Save button, but if you are going to add more attendee's you can select the Add Another button before you select Save.
When complete you will be back to the event attendance grid with your need attendee in the list.
Import Attendees
You can import attendees from a spreadsheet by following these directions.
Check-in Attendee
From the Event Grid select the event you want to manage and select the button.
Then once you have selected manage you will be able to view the event roster, select the check-in button next to the participant
Once the check-in button has been selected you will be brought to the check-in menu
From here scroll down to indicate that the participant has turned in their health form and the date it has been received as well as any other medical conditions or notes
Once that has been done, you can select the green checkin button to check the participant in
Now you are all set, the candidate has been checked in and the date of check-in will be indicated
Edit Member Information from Event Manager
From the Event Grid select the event you want to manage and select the button.
Check-out Attendee
From the Event Grid select the event you want to manage and select the button.
Then once you have selected manage you will be able to view the event roster, select the check-out button next to the participant
Once you have done so, you are all set, the candidate has been checked out and the date of check-out will be indicated
Event Wizards
From the Event Grid select the event you want to manage and select the button.
Then once you have selected manage you will be able to view the event roster, hover over "Wizards"
There are five different wizard options:
- Callout Completion
- Ordeal Completion
- Brotherhood Completion
- Vigil Honor Completion
- Service Hours
Callout Completion
Select "Callout Completion"
Step 1
- Select whether or not to include checked in candidates
- The number of records on a page can be updated by selecting from the following options
- 100
- 250
- 500
- 1000
- Once you have selected all of the candidates select "Next"
Note: You have to select at least ONE candidate in order to continue
Step 2
- Insert the Callout Date **
- Once completed select "Next"
** REQUIRED fields will be Callout Date.
Once selected you will be presented with a confirmation screen.
Please note: this action is irreversible, it CANNOT be undone.
If you wish to continue select "Ok"
Step 3
- Select Export Format
- Excel Workbook
- Excel 97-2003 Workbook
- CSV
- Select Line One Text
- None
- Dues Year
- Chapter
- Unit
- Selection Sort Order
- Name
- Dues Year
- Chapter
- Unit
- Zip Code
- Confirm whether or not you want one label per address
- Confirm whether or not you want to include bad addresses
- Select Export type
- Print / Export Labels
- Bulk Mail Report
Ordeal Completion
Select "Ordeal Completion"
Step 1
- Select whether or not to include checked in candidates
- The number of records on a page can be updated by selecting from the following options
- 100
- 250
- 500
- 1000
- Once you have selected all of the candidates select "Next"
Note: You have to select at least ONE candidate in order to continue
Step 2
- Insert the Ordeal Date **
- Complete Dues Information
- Payment Method
- Receipt Number
- Payment of current year & amount
- Payment of next year & amount
- Complete Service Hours info
- Select whether or not to include service
- Service Date **
- Service Hours **
- Service Description
- Once completed select "Next"
** REQUIRED fields will be Ordeal Date, Service Date, and Service Hours.
Once selected you will be presented with a confirmation screen.
Please note: this action is irreversible, it CANNOT be undone.
If you wish to continue select "Ok"
Step 3
Membership cards
- Select Card Type **
- 2018/2021 Printing
- 2013 Printing
- Sort Order **
- Last Name
- Chapter
- Unit
- Zip Code
- Skip Cards **
- Card Front
- Name Format
- First Name
- Nickname
- Select whether to include Chapter Name and/or Unit
- Secretary's Name **
- Name Format
- Card Back (Note: Only for the 2018/2021 card printing)
- Top Field
- None
- Annual Pass
- Scouting Member ID
- Chapter
- Level Dates
- Unit
- Custom Text
- Top Custom Text
- Bottom Field
- None
- Annual Pass
- Scouting Member ID
- Chapter
- Level Dates
- Unit
- Custom Text
- Bottom Custom Text
- Bar Code
- None
- Scouting Member ID
- Top Field
- Select Printing Option
- Card Front
- Card Back
- Once done select "Next"
** REQUIRED fields will be Card Type, Sort Order, Skip Cards, and Secretary's Name.
Step 4
- Select Export Format
- Excel Workbook
- Excel 97-2003 Workbook
- CSV
- Select Line One Text
- None
- Dues Year
- Chapter
- Unit
- Selection Sort Order
- Name
- Dues Year
- Chapter
- Unit
- Zip Code
- Confirm whether or not you want one label per address
- Confirm whether or not you want to include bad addresses
- Select Export type
- Print / Export Labels
- Bulk Mail Report
Brotherhood Completion
Select "Brotherhood Completion"
Step 1
- Select whether or not to include checked in members
- The number of records on a page can be updated by selecting from the following options
- 100
- 250
- 500
- 1000
- Once you have selected all of the members select "Next"
Note: You have to select at least ONE member in order to continue
Step 2
- Insert the Brotherhood Date **
- Complete Service Hours info
- Select whether or not to include service
- Service Date **
- Service Hours **
- Service Description
- Once completed select "Next"
** REQUIRED fields will be Brotherhood Date, Service Date, and Service Hours.
Once selected you will be presented with a confirmation screen.
Please note: this action is irreversible, it CANNOT be undone.
If you wish to continue select "Ok"
Step 3
Membership cards
- Select Card Type **
- 2018/2021 Printing
- 2013 Printing
- Sort Order **
- Last Name
- Chapter
- Unit
- Zip Code
- Skip Cards **
- Card Front
- Name Format
- First Name
- Nickname
- Select whether to include Chapter Name and/or Unit
- Secretary's Name **
- Name Format
- Card Back (Note: Only for the 2018/2021 card printing)
- Top Field
- None
- Annual Pass
- Scouting Member ID
- Chapter
- Level Dates
- Unit
- Custom Text
- Top Custom Text
- Bottom Field
- None
- Annual Pass
- Scouting Member ID
- Chapter
- Level Dates
- Unit
- Custom Text
- Bottom Custom Text
- Bar Code
- None
- Scouting Member ID
- Top Field
- Select Printing Option
- Card Front
- Card Back
- Once done select "Next"
** REQUIRED fields will be Card Type, Sort Order, Skip Cards, and Secretary's Name.
Step 4
- Select Export Format
- Excel Workbook
- Excel 97-2003 Workbook
- CSV
- Select Line One Text
- None
- Dues Year
- Chapter
- Unit
- Selection Sort Order
- Name
- Dues Year
- Chapter
- Unit
- Zip Code
- Confirm whether or not you want one label per address
- Confirm whether or not you want to include bad addresses
- Select Export type
- Print / Export Labels
- Bulk Mail Report
Vigil Honor Completion
Select "Vigil Honor Completion"
Step 1
- Select whether or not to include checked in members
- The number of records on a page can be updated by selecting from the following options
- 100
- 250
- 500
- 1000
- Once you have selected all of the members select "Next"
Note: You have to select at least ONE member in order to continue
Step 2
- Insert the Vigil Date **
- Complete Service Hours info
- Select whether or not to include service
- Service Date **
- Service Hours **
- Service Description
- Once completed select "Next"
** REQUIRED fields will be Vigil Date, Service Date, and Service Hours.
Once selected you will be presented with a confirmation screen.
Please note: this action is irreversible, it CANNOT be undone.
If you wish to continue select "Ok"
Step 3
Membership cards
- Select Card Type **
- 2018/2021 Printing
- 2013 Printing
- Sort Order **
- Last Name
- Chapter
- Unit
- Zip Code
- Skip Cards **
- Card Front
- Name Format
- First Name
- Nickname
- Select whether to include Chapter Name and/or Unit
- Secretary's Name **
- Name Format
- Card Back (Note: Only for the 2018/2021 card printing)
- Top Field
- None
- Annual Pass
- Scouting Member ID
- Chapter
- Level Dates
- Unit
- Custom Text
- Top Custom Text
- Bottom Field
- None
- Annual Pass
- Scouting Member ID
- Chapter
- Level Dates
- Unit
- Custom Text
- Bottom Custom Text
- Bar Code
- None
- Scouting Member ID
- Top Field
- Select Printing Option
- Card Front
- Card Back
- Once done select "Next"
** REQUIRED fields will be Card Type, Sort Order, Skip Cards, and Secretary's Name.
Step 4
- Select Export Format
- Excel Workbook
- Excel 97-2003 Workbook
- CSV
- Select Line One Text
- None
- Dues Year
- Chapter
- Unit
- Selection Sort Order
- Name
- Dues Year
- Chapter
- Unit
- Zip Code
- Confirm whether or not you want one label per address
- Confirm whether or not you want to include bad addresses
- Select Export type
- Print / Export Labels
- Bulk Mail Report
Service Hours
Select "Service Hours"
Step 1
- Select whether or not to include checked in members
- The number of records on a page can be updated by selecting from the following options
- 100
- 250
- 500
- 1000
- Once you have selected all of the members select "Next"
Note: You have to select at least ONE member in order to continue
Step 2
- Complete Service Hours info
- Service Date **
- Service Hours **
- Service Description
- Once completed select "Next"
** REQUIRED fields will be Service Date, and Service Hours.
Once selected you will be presented with a confirmation screen.
Please note: this action is irreversible, it CANNOT be undone.
If you wish to continue select "Ok"
Crews
From the Event Grid select the event you want to manage and select the button.
Then once you have selected manage you will be able to view the event roster, hover over "Crews"
There are 3 option under crews:
- Crew Editor
- Crew Generator
- Assign Extended Elangomats
Crew Editor
Hover over Crews and select "Crew Editor"
NOTE: If you haven't generated any crews then this screen won't show much information
Seeing Remaining Candidates:
This section shows you all remaining Checked in and Registered candidates that may need crews
Crew Selector:
The crew selector is in the bottom left hand side of the crew Editor screen
You can add crews by Clicking the red plus icon
You can edit crews by clicking the red pen icon
You can delete crews by clicking the red trash can icon
Once a crew is selected you can add candidates, add elangomat's, and remove candidates from the crew
Adding Candidates
- Click the red "Add Candidate" Icon
- Look up / Select an candidate from the drop-down menu
- Once selected click "Save"
Adding Elangomat
- Click the red "Add Elangomat" Icon
- Look up / Select a member from the drop-down menu
- Once selected click "Save"
Removing Candidates
- Select the candidate you wish to remove
- Click the red "Remove" icon
Crew Generator
Hover over Crews and select "Crew Generator"
In the crew Generator screen (See Below) you will see many options. Under "Existing Crews" you will see a number of statistics: To Be Assigned, Checked In, and Registered. These statistics show you how many youth, young adults, adults, and the total amount of candidates need crews made.
Options:
The following are options that are not required but are available
- Clear Existing Crews
- Allows you to clear all current crews and make new
- Include not Checked in
- Allows you to include candidates that have registered but not yet checked in
- Group By Chapter
- Groups Crews by chapters
- Keep Adults Together
- There are 3 different options here
- Mix Youth and Adults in Crew(s)
- Assign Adults to Separate Crew(s)
- Don't Assign Adults
- There are 3 different options here
Number of Crews to Generate
After you have filled out the about you have the option to manually select the number of Crews to generate. The recommended number of candidates per crew is 8.
NOTE: If you don't have any candidates checked-in yet, you need to select the "Include Not Checked In" option from the options section in order to make crews
NOTE: The answer to the "Keep Adults Together" option from the option sections will change how many adult crews you can generate
Once you are done click "Generate" to generate your crews.
Assign Extended Elangomats
Hover over "Crews" and select "Assign Extended Elangomats"
Extended Elangomats are individuals that stay in contact with their crews before/after an induction weekend. Assigning extended Elangomats allows them to message the candidates/members/ through their member portal
